Seeds
Seeds


 Growshop
 Nutrients


 Extractions
 CBD
CBD
 Magic Mushrooms
 Headshop
List of contents
After presenting you the instructions for the Tatandi mushroom growing kits, today we do the same with those from Innervisions, a brand that develops its kits for those who want to intervene more directly in the process while learning how to prepare their own mycelium reproduction medium and fruiting substrate.
The convenience of the Innervisions system is that you already have all the material you will need prepared and sterilized, ready to start working and achieve a fantastic harvest in a few weeks. Let's see how to do it!

Mushroom cultivation with Innervisions kits
Innervisions has a system that is somewhat different from other brands such as Tatandi or Freshmushrooms, with greater control by the grower, since you must be the one who inoculates the spores in a medium to reproduce the mycelium, to later prepare the substrate where it will fruit and produce mushrooms. This is the content that the Innervisions kits include:
- 1 Mush Bag with 425 g of sterilized rye
- 1 Syringe (with 5 ml of spores in suspension)
- 1 Culture box (1200 ml) with air filter
- 1 Grow bag with air filter
- 200 ml of vermiculite
- 400 ml of perlite
- 1 alcohol swab
- 2 clips
- 1 sticker
In addition to the utensils included in the kit, you will also need a lighter (the ideal is to use an alcohol burner, although you can do it with a conventional gas one), a spoon, and scissors, of course properly disinfected. Always remember that hygiene is a key factor when growing mushrooms, especially when you work with spores or mycelium.
To disinfect the work area and your hands (or gloves, which would be ideal) you can use 70% isopropyl alcohol or a mixture of 9 parts water to one part bleach. The utensils can be disinfected with the alcohol swab included in the kit. Let's see how to carry out the whole process step by step.

Inoculation of the spores
The first thing you should do is inoculate the spores contained in the syringe (5ml) in the bag containing the sterilized rye grain. After a few weeks, the rye will be fully colonized by mycelium, and it will be time to prepare the substrate for fruiting. But let's not advance events and focus on your current task, the inoculation.
With thoroughly clean and sanitized hands, use the alcohol swab included in the kit to sanitize the inoculation port of the rye bag. Do not touch the port once it has been disinfected! Next, shake the syringe well for 5-10 seconds to mix the spores well, remove the protective cover, and heat the needle with the lighter for a few seconds, until it is red hot. Then let it cool for 15-20 seconds before inoculating.
Carefully insert the needle of the syringe through the injection port and empty its contents into the rye bag. Remove the needle and seal the port with the included sticker. Now all that you have to do is to leave the bag in a dark and warm place, between 20-30ºC (ideally about 28ºC). After about a week, you will see how the mycelium has already colonized part of the grain. Carefully, try to break it a bit and mix it with the rest of the grain, so the colonization will be faster. This phase will end after another 2-3 weeks, when you see the entire grain covered by white mycelium and without dark spots (which would reveal contamination and ruin your crop).
Substrate preparation
When you have the rye fully colonized, it is time to prepare the substrate for fructification. To do this, insert the included perlite into the base of the transparent plastic box, followed by another layer made up of your grain colonized with mycelium (which you must break into small pieces before removing it from its bag) and, finally, a last layer of hydrated vermiculite on the mycelium. In this way, you get a high level of humidity in the substrate. Of course, before starting, thoroughly disinfect the work area, the grow box, and your hands!
To prepare the vermiculite with the ideal humidity level, you just have to open the bag that contains it and introduce 50ml of tap water. Close the bag, mix well until the vermiculite is hydrated, and you already have it ready to use as a grain cover with mycelium. Once you have the 3 layers in the box, you can close it with its lid. A good trick is to gently shake the box each time you put in one of the 3 "ingredients" so they settle in an even layer.


Now all that remains is to leave the box in the same place where you had previously reproduced the mycelium in the grain bag and wait a few days. In 1-2 weeks, you should be able to move on to the next stage.

Mycelium fruiting
After a few days, and when the grain inside the box is once again fully colonized by mycelium, you can move on to the next step, growing the mushrooms! Disinfect your hands and work area and carefully open a corner of the lid of the box to fill it with tap water. Once you see the substrate fully submerged, cover the box again and let it rest for 12 hours. After this time, open the corner of the lid again and empty the water box.
Once the substrate is well hydrated, remove the lid completely and insert the box into the transparent culture bag, folding its upper end and closing it with the included clips. Save the lid, you'll need it when you're done growing! Leave the box in a place with indirect light (never in full sun or on a heater) and warm, around 25ºC would be ideal. After a few days, you will see the first primordia appear, and in about 2 weeks from when you put the box in the bag, you will have your first mushrooms.
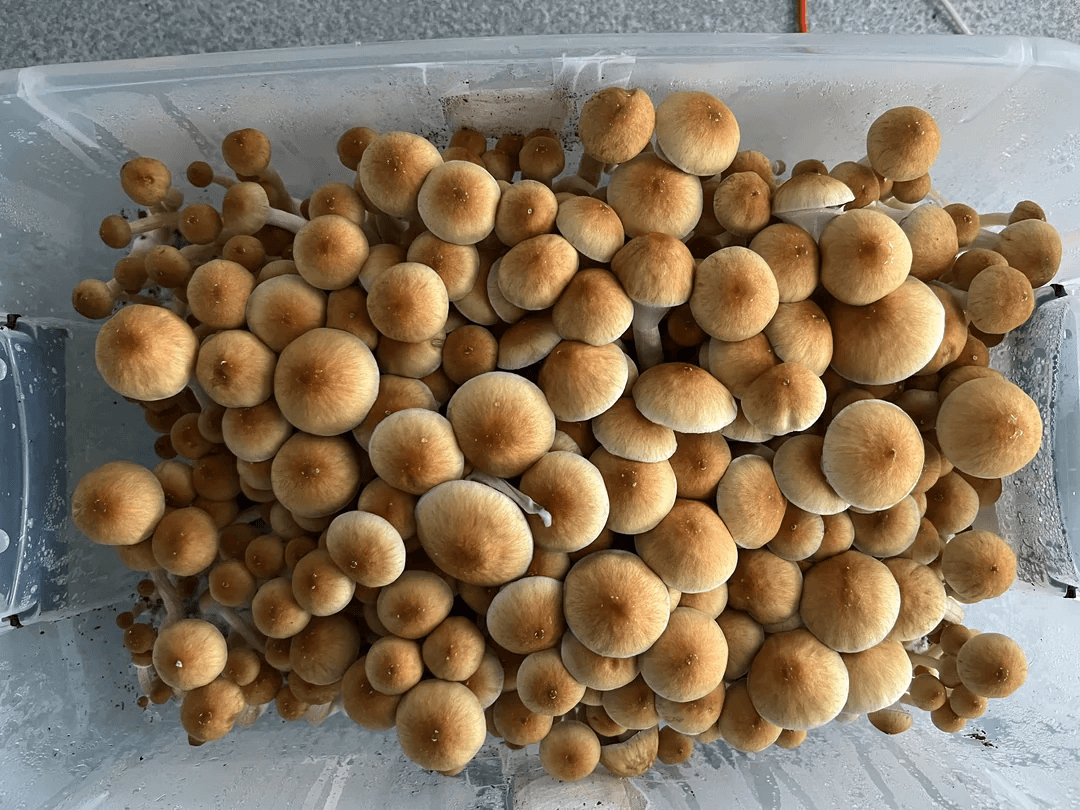
Mushroom harvest
Mushrooms do not fruit continuously, but do so in "batches" or "flushes". The best time to harvest them is when the veil between the cap and the stem is about to tear, just before the cap opens completely. To harvest them, you just have to grab their base and twist it slightly while pulling upwards, you will see that they come out easily. Clean the base from substrate remains and you have them ready to use or, if you prefer, to dry. If, after harvesting all the large mushrooms, you see that some small ones remain (even between the substrate and the side walls of the box), you can leave them to grow during the next fruiting or flush, although this can lead to some other problems. If you don't want trouble, remove them along with the rest.
Second flush or fruiting
After harvesting the mushrooms, it will be necessary to rehydrate the substrate to prepare it for the next fruiting cycle. Refill the box with water and cover it for another 12 hours. Once this phase is finished, drain the excess water and reintroduce the box in the grow bag, just as you did in the first harvest. All you have to do is repeat this harvest/hydration operation until the cake "runs out", something that can happen after 4 or 5 flushes.

Some final tips
- Hygiene: As we always tell you when talking about growing mushrooms, hygiene is essential to be successful. Before getting to work, disinfect the work area and utensils with isopropyl alcohol or water and bleach. Wash your hands with soap and water and then disinfect them with alcohol (the same if you are going to wear gloves, which would be the most recommended).
- Culture location: finding a good place to grow mushrooms is easy, as they need little light and the degree of humidity is controlled by the bag. Basically, you need a warm place, although never put the bag or box directly on a heat source. This will cause excessive evaporation of the water present in the substrate, in addition to not favoring the gas exchange necessary for generous fruiting.
- Colonization: Do not open the culture bag containing the mycelium growing on the rye grain in any case except to prepare the substrate. As the mycelium colonizes the grain, try to break it up and mix it every few days to get a fast and uniform colonization.
- Contamination: if you see spots that could reveal the growth of some other type of fungus (trichoderma, for example, looks like dark green spots) either in the bag of grain or in the box, immediately discard the contaminated bag or box without opening them.
Of course, if you have any questions or want to make a comment, you can leave us a message and we will be happy to answer you.
We wish you good luck, and a happy harvest!