Seeds
Seeds


 Growshop
 Nutrients


 Extractions
 CBD
CBD
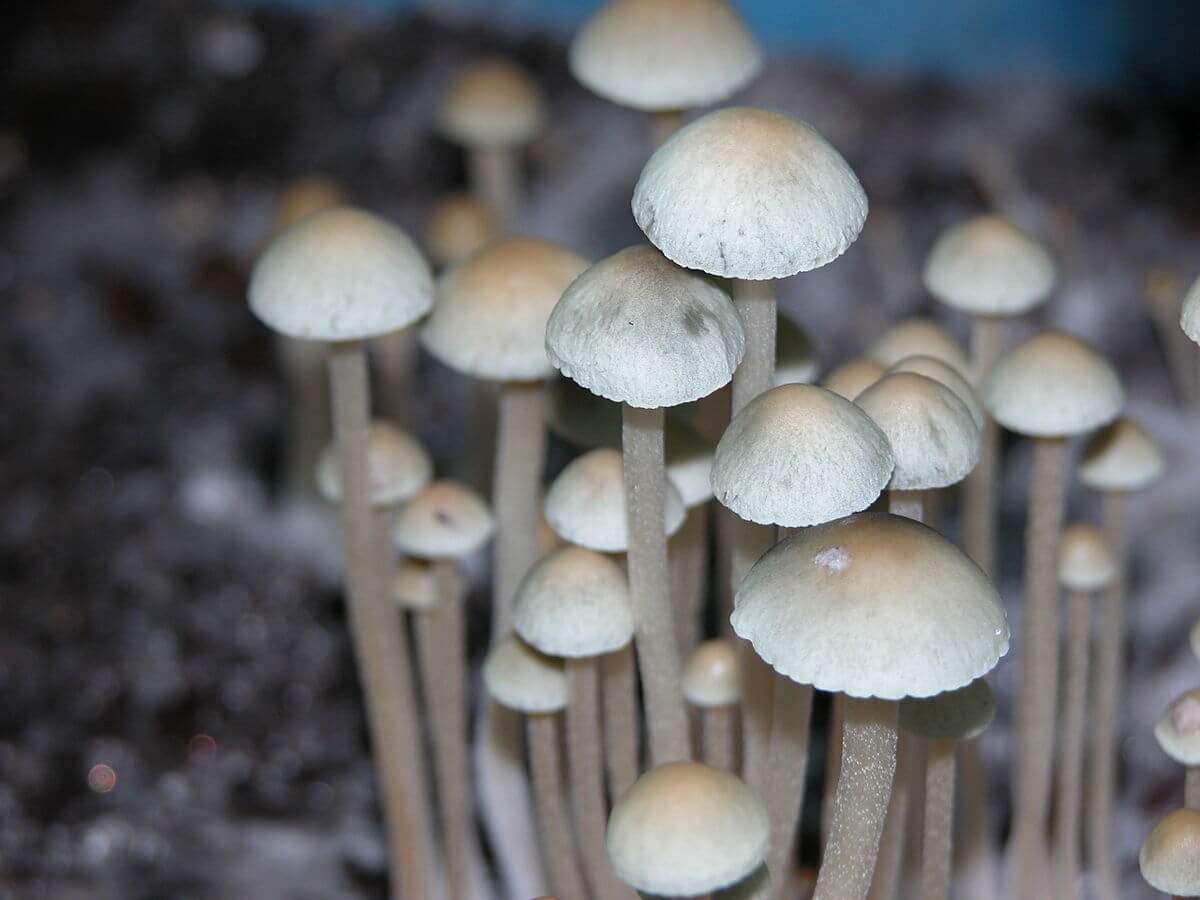
 Magic Mushrooms
 Headshop
List of contents
- Growing Tatandi Mushroom Kits, Conventional Varieties
- Opening of the mushroom kit
- Mushroom Kit Sealing
- Environmental conditions for the appearance of primordia
- Growth of primordia
- Mushroom fruiting
- Harvest
- Second harvest or flush
- Growing Tatandi Mushroom Kits, Hybrid Varieties
- Preparation of the kit
- The appearance of the primordia
- Fructification
- Harvest
- Second fruiting or flush
- Alternative Ways to Fruit Mushrooms
Today we present the growing instructions for Tatandi mushroom kits, a Spanish company that has quickly gained a foothold in the market thanks to its varied offer and the quality of its growing kits, which usually give great results. And to make sure that it will be like that, we are going to detail step by step how to carry out your cultivation so that it ends with generous fruitfulness.
As you will see, Tatandi offers cultivation instructions for both its conventional varieties and hybrids, such as White Rabbit or Treasure Coast Albino, something that is not common in other brands that offer similar products. Let's take a look below at how you should grow both types of Tatandi mushroom kits to maximize your chances of success.

Growing Tatandi Mushroom Kits, Conventional Varieties
You already have your Tatandi mushroom kit at home and you are ready to start... let's do it on the right foot! The first thing you should know, if you don't already know, is that hygiene is very important when growing mushrooms. Disinfect the area where you are going to work, any utensil that you are going to touch, and use latex or nitrile gloves to handle the kit. The ideal is to also disinfect the gloves once you wear them, waiting to touch anything until they are dry.
To disinfect your material you can use 70% isopropyl alcohol or a 10% mixture of water and bleach (9 parts water and one part bleach). If you have higher purity isopropyl alcohol, you can mix it with distilled water to reach the 70% you are interested in.
Opening of the mushroom kit
Once you have disinfected your work area (including your gloves!) you can proceed to break the seal on your grow kit. Next, lift the lid at one corner of the kit so that the cake inside gets air. This is a very important step for the mycelium, which will receive oxygen for the first time and will "activate" for subsequent fruiting. Let it air out for a minute and move on to the next point.
Mushroom Kit Sealing
Yes, although it may seem strange to you, the next and very important step is to close the kit again with its plastic lid. However, do it so that it is well sealed on all sides (you will hear a "click" when it closes correctly) except for one of the corners. In this way, the cake will be able to preserve the humidity that it has stored but there will be a slight exchange of air that will facilitate the appearance of the primordia.
A correct relationship between temperature and humidity is essential for the proper development of the mushrooms, so it is important that the cake remains with a high degree of humidity but with a slight air renewal. In case of closing it completely, this ventilation would not occur and fruiting would not be promoted; on the other hand, if you leave it too open you run the risk of your cake drying out and seeing your crop ruined.
Environmental conditions for the appearance of primordia
Once you have closed the kit again as we have explained, it is time to leave it somewhere for a few days until you see the appearance of the first tiny mushrooms, the primordia. Magic mushrooms usually prefer a temperature range between 21 and 30ºC, with 23ºC being the ideal temperature. Regarding humidity, it will be preserved thanks to the lid, so you should not worry too much for the moment.
To achieve correct air renewal, it is recommended to open the lid of the kit once a day for one minute (remember to thoroughly disinfect your hands or gloves before doing so), and close the lid again as you had done at the beginning, leaving an unsealed corner. Place your kit somewhere with indirect or residual light, never near sources of strong heat or within direct sunlight. Also, try to keep it away from strong drafts and the ground or low areas of the room.

Growth of primordia
With your kit in the right place and a little patience, you will soon see the first primordia appear on the cake... your little mushrooms are beginning to appear! Continue as you have done so far, ventilating the kit for one minute a day and monitoring the state of the primordia and their growth rate. Once you see a considerable amount of primordia or pins colonizing the surface of the cake, it will be time to move on to the next step, in which you will use the transparent plastic bag included in your kit. You are about to see your first mushrooms and start the harvest!
Mushroom fruiting
You already have your cake full of small mushroom pins, so the time has come to change its environmental conditions a bit to favor fruiting or, in other words, the development of the mushrooms. To do this, remove the lid (save it, you will need it later) and put the kit inside the plastic bag. Spray the walls of the bag (never the cake directly) with water, leaving the closure open approximately 1/3 of its length. As always, remember to disinfect both the work area and your hands before starting (we usually disinfect the bag as well).

From here, it is a matter of leaving the kit in the same place where you had it until now, with identical temperature and light conditions. It is important not to completely close the bag in any case, since the cake needs to breathe for the correct development of the primordia and mushrooms. Keep an eye on the walls of the bag daily; if you find them dry, you know that it is time to spray them, making sure that this does not happen again (it will depend to a large extent on the humidity of the room where the kit is located).
As soon as the primordia start to look like small mushrooms, it's time to leave the opening of the bag a little more open, this time about 2/3 of its length. You do this because as the mushrooms grow and develop, they need more air renewal to do it copiously and without problems. Keep in mind that with the bag being more open, the walls of the bag will probably dry out faster than before, so you may need to check more often.

You can check the moisture of the cake by illuminating it with the flashlight of your phone; if you see small drops on the substrate, it means that everything is going well, it is at its optimum humidity point. If you don't see them, it means that the environment inside the bag is too dry, so it is best to spray the walls of the bag with water more often so that the ambient humidity inside the bag is higher. As a last resort, you can spray water from a meter or so away so that the microdroplets fall on the cake by gravity, but never spray it directly.
Harvest
The moment you have been waiting for has finally arrived! Once your mushrooms are fully developed, there will be a time when the veil that joins the stem and the cap is torn, allowing the latter to open and release the spores contained within. Well, the optimal time to harvest your mushrooms is just before (or while) the veil breaks away from the cap, which usually takes a few hours. Thus, you may not see them ready when you get up in the morning, but they may be at their perfect point at dinner time.
To remove them from the cake, simply grab them by the base and twist them gently as you pull up, it shouldn't be too difficult to remove them, although try not to touch the cake at any time. Clean the area at the base of the mushrooms and they will be ready to be eaten or dried, as you prefer.

Second harvest or flush
Yes, the good news is that once the harvest is complete, you can rehydrate your cake for a second crop! To do this, you just have to fill the kit with water to the brim and cover it for about 20 minutes, at room temperature. Once this time has elapsed, empty the water from the kit and close the lid as you did at the beginning of the crop, leaving one corner of the kit unsealed. From here, you only have to follow the same steps that you did in the first crop to get a second flush.
Growing Tatandi Mushroom Kits, Hybrid Varieties
If you have purchased a kit of one of Tatandi's hybrid varieties, the instructions are slightly different. Let's see them in detail:
Preparation of the kit
As always, disinfect the work area and your hands (or gloves) and break the seal on the plastic box. Save the lid (you will need it after harvest) and open the bag included with the mulch substrate. Spread it over the cake with the help of a disinfected spoon, ensuring that there is a thin and uniform layer on it.
The appearance of the primordia
Once you have spread the coverage on the cake, put your kit inside the transparent plastic bag and spray tap water on the inside walls of the bag, making sure that the water does not fall on the cake. Leave the bag half open to get enough air renewal. If you observe that after a few hours, the walls of the bag have already dried, it means that you need more humidity inside it: introduce 1-2cm of water into the bag and spray again. You can also close the zipper of the bag a little more, although never close it completely. Maintain these conditions until you see the first pins or primordia appear (you may need to spray the walls of the bag daily).
Fructification
Once you see the first primordia appear, it is time to increase air renewal. Open the zipper on the bag about 2/3 of the way. From here on, 1-2 sprays a day are recommended, leaving the bag open for about 10 minutes each time you spray (first let the cake breathe, after 10 minutes spray and leave the bag open again with the zipper open 2/3). In a few days, your primordia will have become stupendous mushrooms!

Harvest
The ideal time to harvest is just when the veil that joins the stem of the mushroom and its cap breaks. After about 5-6 hours from this moment, it will be the ideal harvest point. Harvest these carefully, twisting them slightly at the base as you pull up, and be careful not to touch anything other than the mushroom you are harvesting.
Second fruiting or flush
To get a new harvest, remove the kit from the bag once you have harvested all the mushrooms and fill it with tap water. Cover the kit with the lid that you kept when you started growing and let it hydrate for 20 minutes at room temperature. Once this time has passed, remove the water from inside the kit and put it back in the bag, repeating the steps we have already seen. If all goes well, in a few days you will see primordia appearing in the substrate again.
Alternative Ways to Fruit Mushrooms
Of course, and in case you already have experience growing mushrooms, you can fruit these cakes in monotubs (transparent plastic boxes where a series of holes are made to promote gas exchange and air renewal) or fruiting chambers especially prepared for it, even with the support of heating and a humidifier. In future articles, we will show you how to do it. Until then...
Happy harvest!